Venting Guide For Residential Wood Fired Pizza Ovens
Aug 12, 2022Not adhering to safe venting rules will make it more likely that your installation will fail to meet local building codes, and not pass inspection. Even worse, poor venting can create a serious hazard, causing a fire or other harm to yourself, and to those around you.
In this guide, we will explain the safety rules for venting your Forno Bravo Oven in various build styles and locations, so you can understand and implement each applicable point with confidence.
1. No Overhead Obstruction Within 10 Feet for Outdoor Installation
To vent your wood fire oven properly, you need to make sure you have a stovepipe drawing the smoke away from the oven chamber. For most outdoor installations, a single wall stovepipe will do the job.
Your Forno Bravo oven comes with a standard, steel or terracotta, single wall stovepipe kit.
Key Rule: Make sure nothing is within 10 feet of the top of the chimney to block it. Otherwise, see point 3.
2. Have an 18-Inch Clearance to Combustibles
The minimum clearance depends if you are using a single wall or double wall flue. For a single wall stovepipe, any combustible material must be kept at least 18 inches away from the flue.
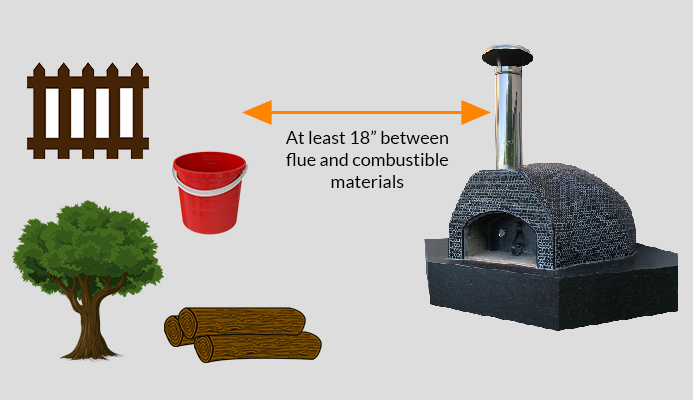
Note: Some oven installation configurations have instructions that specify a different clearances, so make sure you read all of the specific instructions for your Forno Bravo Oven in the owner’s manual.
You may request using a ‘clearance reduction system’ in your permit application (i.e. double wall pipe or other mitigation) that is acceptable to the local regulating authority.
![]()
With double wall pipe, you must allow 2-inches of clearance (air gap) between the chimney pipe and any combustible material.
Also, never fill the 2-inch clearance space above your chimney pipe/chimney cap with insulation or other materials that can catch on fire, such as plywood, lumber, sheetrock, plaster, curtains, furniture, electrical wiring, and building insulation.
Note: The illustration above represents a fire hazard because the frame of the roof cap is made of wood, which is flammable, and is too close to the top of the chimney pipe.
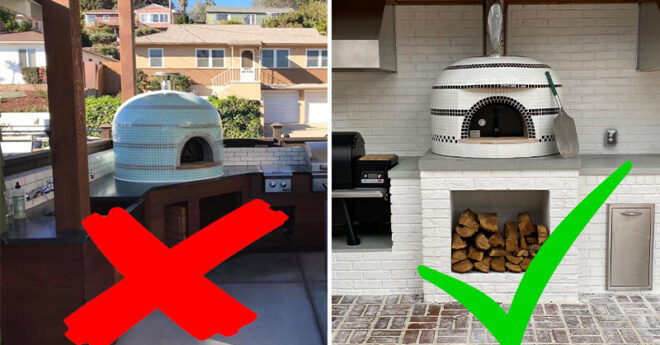
3. Follow the “3-2-10 Rule” for Outdoor with Overhead Obstruction or Indoor Installation
Is your wood fire oven under a partial or full roof, like a pergola or enclosed patio? If so, your chimney will have to penetrate the roof using double wall pipe and flashing, and extend past it; alternately, you will need to install an elbow kit and move around the roof line to prevent a fire hazard.
A double wall stainless steel chimney system is required to penetrate a roof because it is air-insulated. Meaning, the outside of the double wall pipe will not radiate heat like a single wall pipe does.
You should also know a few things about the chimney height in relation to the roof. It’s called the “3 – 2 – 10 Rule.”
Per the National Fire Protection Association Standard #211, all “Chimneys shall extend at least three feet above the highest point where it passes through the roof of a building, and at least two feet higher than any portion of a building within ten feet.”
![]()
Other considerations:
- You can install the DuraTech UL103HT chimney system, or an equivalent, up to 60 feet high for the full chimney length, provided you follow the installation instructions for properly securing and strapping the vent system.
- Keep in mind that if the chimney extends more than five feet above the roof, you must use an Extended Roof Bracket.
- Due to the overlap of the joints, you have to subtract 1-1/4 inches from each chimney section’s height to calculate the installed height.
If you need to go around the roof instead of flashing it through,
- You can use up to two 30-degree elbow offsets with the DuraTech chimney system.
- Warning: Never use two 30-degree elbows to create a 60-degree angle because it will restrict airflow and choke the draw.
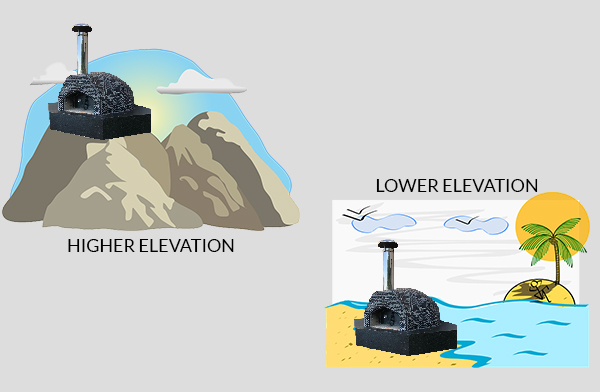
4. Consider Longer Chimney Height In Lower Elevation
In traditional wood oven ventilation, the vent and chimney create a strong draw, helping pull hot air out of the chamber as cool air enters the oven mouth, which increases the oven’s convection heating ability.
Higher elevations have better natural draw than sea level, because of the reduced atmospheric pressure, drier air, and cooler air temperature typically found there.
If you live in a lower elevation closer to sea level, consider increasing the chimney height to improve draw for best wood-fire results. You could possibly add a cap fan as well. Consult with a team member specialist for further assistance (see below for contact information.)
5. Consider Your Surroundings
Check to see if your nearby surroundings have any elements that may impact airflow or draw. For example, barometric pressure, wind patterns, and nearby obstructions like tall buildings may all reduce your wood fired oven’s draw.
If you have these factors in your surroundings, a double wall chimney with a cap fan can help improve the draw and oven performance.
6. Indoor Installations and Closed Air Porch
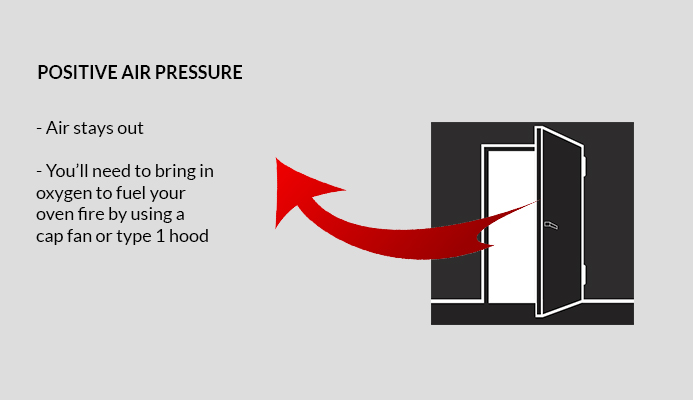
For best results with a Forno Bravo Oven indoor/enclosed installation, you may need to consider using makeup air. Many indoor spaces have positive air pressure, where more air gets out of your home than into it. That means you will need to bring more oxygen in to create an equitable air balance for the oven to draw correctly.
Solutions:
- You can get a better draw by adding a cap fan.
- You could also upgrade to a grease duct or type 1 hood.
If your installation location supports these types of equipment, please consult a local HVAC specialist for further assistance. This is both for fire safety reasons and because permits and inspections will typically be required by local municipalities. You should also consult your owner’s manual for additional instructions regarding indoor installations for the best safety measures and oven performance.
Reminder: Only model sizes 80 – 180 are certified for indoor use. The Giardino, Primavera, Napolino, and Bella ovens are designed for outdoor installation only.
3 Tips for Managing Smoke
- Only use dry, seasoned, non-pitchy hardwood in your wood fired oven. The high moisture content in “green” wood releases a lot more smoke than dry wood. Wood should be given about six months to a year to dry properly. Learn more about choosing the right firewood HERE.
- Pre-warm your flue. Stack the wood for your fire inside the oven, but before lighting it, hold some lit newspaper directly under the flue for a little bit. (Hold the paper using a fire-safe glove.) This will pre-warm the chimney and improve draw. As the paper burns down, simply add it to the kindling in your wood pile inside the oven.
- Once your fire is going, you can pre-heat an additional piece of wood by placing it on the far side of the oven away from the flame. As your flames die down, simply place the fresh piece on the pile using your steel, turning peel. Since it is already warm, it will combust quickly with little additional smoke.
Contact Us
If you need more help, please submit a request to our technical team below or visit our contact page to ask questions and receive personal help regarding your oven venting needs.