

Brick Oven Pizza Sequence
Preparing to Cook your Brick Oven Pizza
You can start your Pizza Dough the night before you are making pizza, the morning you want to make pizzas, or even about 2 1/2 hours before you want to cook. If you don’t have that much time, don’t worry. Click on Dough in a Hurry to learn how to speed things up.
Even better, you can download the free Forno Bravo Wood-Fired Pizza eBook. It outlines everything you need to make Perfect Pizza Dough by weight, and really great pizza.
![]()
Brick Oven Pizza Preparation
1 1/2 hours before you want to cook, or however long your oven takes to get to pizza heat, fire your oven. Check out our Oven Management section for tips on how to fire your oven and control its heat, and our Pizza Stone section for tips on using a stone insert in your regular oven. You can also download our PDF Pizza Stone Pizza instruction sheet.
While your fire is heated, you have time to collect and prepare your food for cooking. You will need:
- Fresh Mozzarella
- Tomato Sauce (try Italian San Marzano Tomatoes)
- Olive Oil
- Fresh Basil
Beyond the basics, your pizza decorating options are limited only by your imagination. One thing to consider when choosing and preparing your Pizza toppings is that we think the best Pizzas are not covered with ingredients (as you would see in a chain Pizza restaurant). Rather, we think that small amounts of the best and freshest ingredient used in interesting and exciting combinations yield the best tasting pizza.

Click on our Pizza Recipes section to see a list of pizzas that we think taste great, and that you might try. There is no right answer, only what tastes good.
If you are interested in seeing how the Italians think you should do it, read our translation of the Vera Pizza Napoletana specification, written by the Italian Ministry of Agriculture for submission to the European Union.
Assembling Your Brick Oven Pizza
Dust your hands with flour, and take a Pizza Ball. Flip it over so that the soft bottom side faces up, gently shape the ball into a flat disk, and then start pulling, stretching and turning the disk in the air to make the dough thinner and thinner. Try to keep working in a circle to keep the thickness of the dough consistent, avoiding thick and thin spots. At the point where you cannot get the dough thinner without making a hole, put your pizza on a floured work surface, and use your fingertips to work out the thick spots by pushing the dough to the outside. We try to make our pizzas about as thick as a credit card and about 10″ in diameter.
Remember that the more you handle the dough, the tougher it becomes. We don’t recommend using a rolling pin, which is hard on the dough and will give you a thin, but tough pizza. In fact, the rolling pin is specifically outlawed in the VPN Specification. Try to shape your dough in the air as much as possible, before you lay it on the counter — it will enjoy not being over-handled, and will reward you with a pizza that is both crisp and delicate.
Also, don’t worry if your pizza is not round. We know a professional chef and bakery owner who loves to make his pizzas “football” shaped. He is so gentle with the dough and creative with his ingredients that his non-round pizzas are among the best we have ever tasted.
You can assemble your pizza either on a solid surface, then transfer it to a metal pizza peel for cooking; or you can assemble your pizzas on short wooden peels, which you can use to place the pizza in the oven. Either work, though in larger ovens it is difficult to reach the back of the oven with a short peel. For more information, read our Pizza Peel pages.
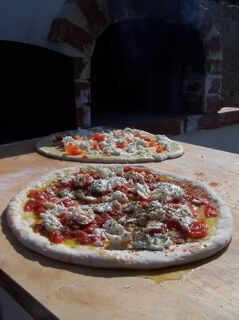
Rosso e Bianco (red and white)
Place your shaped pizza dough on a dusted pizza peel, sprinkle the dough with olive oil, enough tomato sauce to cover and a handful of chopped Mozzarella. We would recommend that you cook a simple Margherita pizza first, beyond venturing into more ingredients. It gives you the chance to savor the flavors of your wonderful ingredients and taste the pleasure of a wood fire pizza. It will also give you a feeling for how pizza cooks. If you prefer a white pizza, simply top your dough with olive oil and Mozzarella and cook.
Cooking Your Pizza
Your oven is fired and the cooking floor is clean; you have assembled your first pizza, and you are ready to go. Test to make sure you pizza is not stuck on your peel by moving your peel forward and backward using short jerks – it should slide easily around. If it does stick, lift it up on one side using your fingers, and throw a little flour underneath. Slide your peel back and forth, and that should loosen it up.
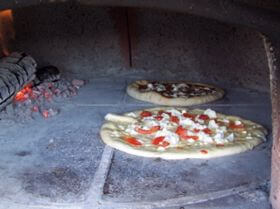
If your pizzas consistently stick to the peel, use a more flour underneath your pizza dough before you start decorating. Also, if you have a group of people assembling pizzas, and one sits for a while before you place it in the oven, there is a large chance it will stick. Choose a spot roughly centered in your oven, at least 6″-8″ away from the edge of the fire as your target, and slide your pizza to that spot. The best way to place your pizza is to push your peel toward your spot, then stop it short just short the spot, allowing the pizza to slide off the peel. Pull the peel backward as the pizza slides forward.
After about 90 seconds, slide your turning peel under the pizza and turn it 180 degrees, so that the side furthest from the fire is facing the oven. If your pizza is burning on the fire side, you can turn the pizza earlier. After another 45-90 seconds, your pizza should be done. There is an on-going debate as to whether you should turn your pizza once or twice. Experiment, and stick with what works best for you.
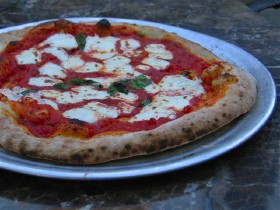
The perfect pizza is bubbling on top with completely melted (and possibly slightly browned) cheese, has a brown outer crust, and a dark brown bottle. The crust is crunchy on the outside and soft and delicate on the inside. Everything is steaming hot. Throw on some fresh basil, use a pizza cutting wheel to cut your pizza into eight pieces and you have done it.
Start Shopping