

Biga Whole Wheat Bread
We’re going to start simple, because the methods described in our first recipe will be used repeatedly in more complex later formulas, and there is no advantage in beginning with a daunting procedure that will have you heading to the supermarket instead.
Biga Whole Wheat Bread*
(Makes 2 8×4 inch loaves)
Many people have problems baking wheat bread, producing loaves that are heavy and dense. This has a lot to do with the nature of the whole-wheat flour because it is relatively low in gluten compared to bread flour. The solution here is to use what bakers call a preferment, or a bit of a boost to get that whole wheat flour really moving, plus adding a percentage of hard, unbleached bread flour and vital wheat gluten. This is pretty well a foolproof recipe, and, even if you’ve never baked bread before, you’ll be pleasantly surprised at your initial success.
Biga
- 8 oz. whole milk
- 8 oz. filtered or bottled (no salt added) or spring water
- ¼ oz (1Tbsp) light brown sugar
- 4 ½ tsp. active dry yeast (ADY)
- 4 ½ oz. whole wheat flour
Stir the milk and water together in an 8 cup bowl. Heat in the microwave until the liquid reaches 90-100°F. Stir in sugar until it dissolves. Sprinkle yeast over the top. Once the yeast softens (about 1 minute), stir it in. Add the whole wheat flour and stir until completely hydrated. Cover the bowl with plastic wrap and set in a warm place to ferment. Depending on the warmth of your kitchen, the mixture will rise up then start to collapse within about 1 ½ hours. When it begins to collapse, it’s ready to use.
While the Biga is rising, begin your mis-en-place for the next steps: weigh out your ingredients into suitable prep bowls, spread out your equipment out ready to go.
Dough
- 9 oz. whole wheat flour
- 9 oz. hard, unbleached bread flour
- 2 oz. softened butter
- 1 ¾ oz. brown sugar (or less if you prefer)
- 2 Tbsp. vital wheat gluten (available at health food stores or specialty markets)
- 2 tsp. sea salt
Combine the Biga, butter, and sugar in the bowl of your mixer with the paddle attachment at speed one for about thirty seconds. Add the flours and the gluten, switch to the dough hook, and mix until everything comes together in a rough ball. Add the salt at this stage. Knead for four minutes on speed two. Turn off the machine. The dough should be tacky, but not sticky. If it’s very sticky, briefly knead in more flour. If it’s too stiff and dry, dribble in a bit more water with the machine running. Switch off the machine, and take the dough’s temperature. Remember that your range is 77-81ºF. If you are on the low end, continue kneading for another minute or two. If on the high end, turn the dough out onto a lightly floured counter and knead by hand until the dough passes the windowpane test.
- Windowpane Test: First, cut or tear off a golf ball-sized piece of dough and flatten it. Next, hold it between both your thumbs and first two fingers, and gently spread the dough apart. If properly kneaded, it will stretch into a thin sheet that you can see through when held up to a strong light, without it tearing or breaking. If it won’t do this, try kneading the dough some more. This test works best with high-protein and finer flour doughs. Whole wheat flour and other gritty flours tend to fail the test. (Feel free to check out our Forum for more discussions on this test.)
Mist a large bowl with cooking spray. Form the dough into a ball. Turn it into the bowl and roll it around to coat with the oil. Cover the bowl tightly with plastic wrap. Set in a warm place for bulk fermentation. The dough should double in size in 1 ½ to 2 hours, depending on the warmth of your kitchen. In summer, 1½ will be enough; 2 hours during a cold winter. It’s ready if you poke the top of the dough with your finger and the indentation stays.
Forming
Turn the dough out onto an unfloured counter and lightly press it flat to degas the dough. Cover with a towel and let rest for five minutes while you prepare two 8×4 inch loaf pans by misting the interiors with spray oil. Using a dough knife, divide the dough into two equal pieces by weight. Pat each piece into an even-sided rectangle about 5 inches wide and 6 to 8 inches long. Working from the 5-inch side, roll up the length of the dough, a section at a time, pinching the seam closed with your fingers at each rotation. As you roll up the dough, it will begin to lengthen. Pinch the final seam closed with the edge of your hand. Rock the loaf with the palms of both hands to even it out. The ends should not be tapered, and the surface of the loaf should be even across the top. It is important that your pans measure 8 inches long by 4 inches wide (this is a standard size; the next size up is 9 inches long). Place the loaves in their pans, making sure that the ends of the loaves touch the ends of the pans to guarantee an even rise. The purpose of this method is to create internal and external surface tension in the dough to give you a strong, even rise.
Cover the pans with lightly misted plastic wrap and set aside in your warm place to rise for about an hour, or until about doubled. The dough should be domed about one inch or so above the edge of the pan before baking.
Baking
As originally written, this recipe was intended for baking in a 350ºF home oven for about 35-45 minutes. In your Forno Bravo pizza oven, with a hearth temperature of around 500ºF, and the door in place, these bread should take about 20 minutes to reach an internal temperature of 190ºF. Turn one loaf out of the pan at this time, and take its temperature to be sure. The sides of the loaves should be golden where they meet the sides of the pan. With an enriched formula pan bread of this kind, injecting steam into the oven is not necessary. Tent the loaves with aluminum foil for the last five minutes or so if the tops are getting too brown for your liking.
If you enjoy this sandwich bread, the next time you make it, toast sunflower, pumpkin and brown sesame seeds in a frying pan until they just begin to crackle. Let cool and add them all during the last two minutes of machine kneading. After that, experiment with your favorite enhancements.
*This recipe is a much-amended version of one by Tami Smith that originally appeared in www.craftybaking.com (formally called www.baking911.com.)
Next. let’s try a Parisian Baguette.
Back Forward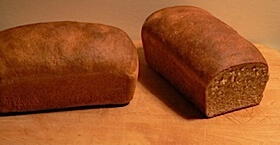
Whole wheat bread
The finished hearth-baked loaves. Note the soft, rather dry crumb that is characteristic of good whole wheat bread.
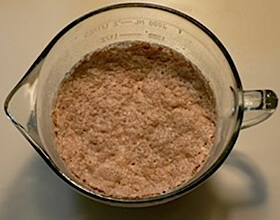
This Biga has just fallen, as you can see by the separation line from the container on the outside edge. It’s ready to use.