Classic Pizza Dough, Neo-Neapolitan-Style
Classic Pizza Dough, Neo-Neapolitan Style
(Makes five 8-ounce pizzas)
What makes this Neo-Neapolitan is that I use American bread flour instead of Italian -00- flour, but you can certainly use Italian flour, such as Caputo, if you want to make an authentic Napoletana dough. Just cut back on the water by about 2 ounces, since Italian flour does not absorb as much as the higher protein American flour. Always use unbleached flour for better flavor but, if you only have bleached flour it will still work even if it doesn’t taste quite as good. If you want to make it more like a New Haven-style dough (or like Totonno’s or other coal-oven pizzerias), add 1 tablespoon of sugar or honey and 2 tablespoons of olive oil. These are optional–the dough is great with or without them. As with the Country Dough, the key is to make it wet enough so that the cornicione (the edge or crown) really puffs in the oven.

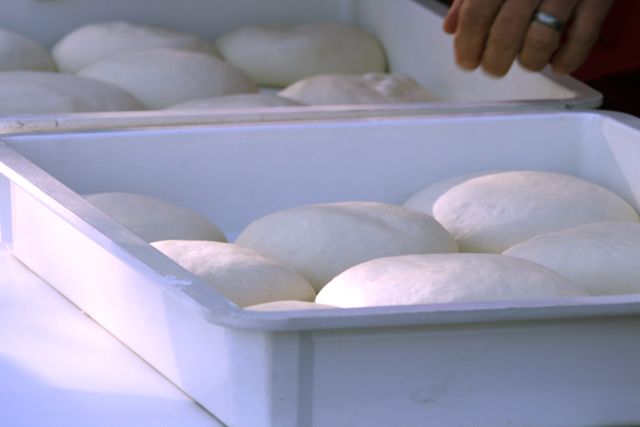
Neo-Neopalitan dough in proofing trays
5 1/4 cups (24 ounces by weight) unbleached bread flour
2 teaspoons (0.5 oz.) kosher salt
1 1/4 teaspoons (0.14 oz.) instant yeast (or 1 1/2 teaspoons active dry yeast dissolved in the water)
2 tablespoons (1 oz.) olive oil (optional)
1 tablespoons (1/2 oz.) sugar or honey (optional)
2 1/4 cups (18 oz.) room temperature water (less if using honey or oil)
–You can mix this by hand with a big spoon or in an electric mixer using the paddle (not the dough hook).
–Combine all the ingredients in the bowl and mix for one minute, to form a coarse, sticky dough ball.
–Let the dough rest for five minutes, then mix again for one minute to make a smooth, very tacky ball of dough.
–Transfer the dough to a lightly oiled work surface, rub a little oil on your hands, and fold the dough into a smooth ball. Let it rest on the work surface for 5 minutes and then stretch and fold the dough into a tight ball. Repeat this again, two more times, at 5 minute intervals. Place the dough in a lightly oiled bowl, cover with plastic wrap, and immediately place in the refrigerator. The dough can be used anywhere from 6 hours to three days after it goes in the fridge.
— (Note: the following steps are the same as for the Country Pizza Dough:) When ready to make the pizzas, pull the dough from the refrigerator two hours prior to when you plan to bake. Divide the dough into five 8-ounce pieces (if there is any extra dough divide it evenly among the dough balls). With either oil or flour on your hands, form each piece into a tight dough ball and place on a lightly oiled pan. Mist the dough balls with spray oil and cover loosely with plastic wrap or place the pan inside a large plastic bag. Give the dough at least 90 minutes before making the pizzas. If you don’t plan to use them all, place the extra dough balls inside of an oiled freezer bag and keep in the refrigerator (for up to three days) or in the freezer (for up to three months).
–If using a pizza stone in your home oven, preheat the oven to the highest setting
one hour before you plan to make the pizzas. If using a wood-fired oven, you know what to do for your particular oven. If you do not have a baking stone you can bake the pizzas on a sheet pan.
–Top with your favorite toppings–this dough can be stretched thin (12-13 inches) for Roman-style pizzas, or 10-11-inches for Naples-style.
Recent Articles by Peter Reinhart
- Update from Peter Regarding our Heritage Radio Network Audio Podcasts
- Pizza Quest: Chef Mike Friedman’s Pizza and Other Jewish Italian American Tributes in DC
- Pizza Quest: Animal-Free Cheese that Actually Tastes and Melts Like Cheese
- Pizza Quest, with Guests Jillana Miller and Ahmad Butler, aka Miller-Butler
- Pizza Quest: Shannon Mangini — Things Can Happen Fast
- Pizza Quest: Anthony Mangieri, with Big News About His New Line of Frozen Pizzas
Add Comment
You must be logged in to post a comment.


Michael.
Luckily, Most of the time when I have made this recipe I have enough eager and hungry family members to use up all of the dough. But,I have improvised bread sticks and used extra pizza sauce to dip them in.
the first time I made this dough, I was so excited I prepared and ate two whole pizzas for myself! I thought I was going to explode!
Peter, I’ve been using the version of this recipe from the”artisan bread’s every day” book with excellent results. (Awesome book, by the way 😉 ) In the book’s version, the dough is divided before it goes in the fridge. Out of curiosity, why does this version of the recipe have you wait and divide the dough on baking day?
Hi Everyone,
Great comments and questions, so here are a few responses: you can, as Matt mentioned, divide the dough into dough balls immediately after mixing it, OR, put the whole bowl away and divide the dough the day of use–either way works with this recipe. When making larger batches, I do pre-divide it but in small, 5 dough-ball batches like this one, I often wait till the next day.
As for why not use ice cold water, I found that if the water is too cold the dough doesn’t get enough fermentation in the fridge, and I decided that I like that early fermentation flavor. With the [i]pain a l’ancienne[/i] the dough gets enough fermentation, between the two days and the particular method, but also needs a little more “push” for the bread applications (ciabatta, mini-baguettes, etc.), which the cold water helps provide by not exhausting the yeast. The two doughs are very similar and, frankly, you’ll get great pizza from either version, as well as great breads and focaaccia, as some of you have noted. That’s what’s so great about these doughs–there are dozens of subtle variations and yet they all work! And don’t forget, you can always freeze the unused dough balls and save them for weeks, even up to three months.
I’ve used the dough recipe from the “Baker’s Apprentice” with consistent success. Unfortunately, that book is stored away for the next six months. Is the recipe posted here the same as in the book?
It’s similar, though not exactly the same. But I think you’ll like it just as much.