

Wood Fired Recipes Community Cookbook
Parisian Baguette
Dec 30, 2011Print
This formula is primarily used for the typical long, skinny loaf seen in Paris, but it can be made into many other shapes, from breadsticks to rolls. Using a preferment, this time in the form of pâte fermentée, gives the loaves a depth of flavor that can’t be achieved any other way. This is a two-day bread, but the first day’s preparation is very simple.
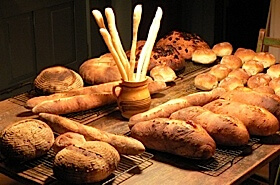
Four baguettes made from this recipe are shown in the foreground, surrounding a jug full of breadsticks made from the same dough.
Parisian Baguette
Ingredients
Day One
- 5 oz unbleached bread flour
- 5 oz unbleached all-purpose flour
- 3/4 tsp sea salt
- 1/2 tsp instant yeast (IDY)
- 7 oz filtered, bottled (no salt added) or spring water at room temperature
Day Two
- 16 oz Pâte Fermentée
- 5 oz unbleached bread flour
- 5 oz unbleached all-purpose
- 3/4 tsp sea salt
- 1/2 tsp instant yeast (IDY)
- 7 oz filtered, bottled water (no salt added), or spring water at room temperature
Instructions
Day One
- Stir the flours and the yeast together in a medium sized bowl. Add the water and stir with a large metal spoon until a ball just begins to form. Add the salt and continue to stir until the flour is completely hydrated. Turn the dough out onto the lightly floured counter and knead vigorously by hand, pushing the dough away from you with both hands, then taking it up to shoulder height and slamming it down on the counter as shown in our hand kneading video clip. Knead in this fashion for six minutes. Sprinkle on flour as required until you have a smooth dough ball that is tacky but not sticky. The internal temperature of the dough should read between 77º to 81ºF.
- Mist a bowl with spray oil, and roll the dough ball in it to coat with oil. Cover the bowl tightly with plastic wrap. Ferment until the dough rises to about 1½ its original volume (about 1 hour). Transfer the dough to the counter, and degas it by kneading lightly (no slamming). Return it to the bowl, recover with plastic wrap and put it in the fridge overnight. Pâte fermentée will keep in the refrigerator for as many as three days. You can also freeze it for up to three months in an oiled freezer bag.
Day Two
- Take the pâte fermentée out of the fridge and cut it into ten or so small pieces with your pastry cutter. Cover with plastic wrap and let rest for one hour to warm up before making your dough.
- Stir the yeast into the combined flours. Add the water to the bowl of your mixer, and then pour in the flour. Use speed one for about a minute or so, and then add the pâte fermentée. Continue mixing until the ingredients form a shaggy ball. Add the salt at this stage, switch to speed two, and knead for four minutes or so. Take the dough’s temperature. If you’re at the low end, continue kneading for another minute. At 81o F, though, remove the dough from the mixer and finish it by hand. The properly kneaded dough should be tacky to the touch, but not sticky. If it is, sprinkle on a bit more flour and continue kneading. The finished dough should be in the right temperature range and pass the windowpane test discussed earlier.
- Round the dough into a ball as shown in the video clip for shaping a boule later in this chapter. Lightly mist a large bowl with spray oil, turn the dough into it, and roll it around to coat with oil. Give the top of the dough ball a quick spray, and then cover the bowl tightly with plastic wrap.
Forming
- Let the dough ferment at warm room temperature for about 2 hours, or until it doubles in size. This is a fairly lean dough, meaning it will not be sticky, so turn it out onto a lightly floured counter. Cut it, by weight, into three equal pieces, with a floured pastry knife as shown in the Baguette Shaping Part One Video. The dough shown there is a double batch, with part of it being reserved for breadsticks.
- The second clip shows the method for forming these loaves to add surface tension, as well as the use of a couche to encourage the loaves to rise upwards rather than spread outwards. The Baguette Shaping Part Two Video demonstrates this technique. Mist the tops of the loaves with spray oil, and cover loosely but completely with plastic wrap. Proof the loaves for about 45 to 75 minutes, until they have risen to 1½ times their original size.
Baking
- Steam your oven for 10 seconds, 10 minutes before the loaves are loaded.
- Depending on how they were formed, these loaves might be too long for your pizza peel. If so, make a simple, rectangular baguette peel from half-inch plywood, about 6 inches wide and 36 inches long. It will not need a handle for smaller ovens. Flour the surface of the peel. At Mary G’s, we prefer to use brown rice flour for this purpose, because it does not burn easily. Slide a long, flexible spatula (sometimes called an icing spatula) under each loaf and place it on the peel and dock or slash it with three separate cuts down the length and center of the loaf. Think of it as cutting a thin flap on each loaf of bread. Load them, one at a time, onto a 550o hearth, by tipping you homemade peel sideways, not trying to jerk them off the front. If you’re feeling brave, load two and then one. Immediately steam the oven once more, and then seal the oven door.
- Bake for ten minutes, then crack the door to allow the steam to escape and the crust to set for two minutes more. At the 12 minute mark, remove one loaf from the oven with your pizza peel. The internal temperature should be 205o F or above, the slashes will have opened, and the loaves should be a rich golden brown.
- Be patient. Cool them on wire racks for at least an hour before serving. The shelf life for these breads is two days in paper bags. This formula can be easily doubled or tripled.
Notes
Variations
This is a versatile dough that can be made into rolls or breadsticks. The technique for forming rolls is shown under the Kaiser recipe later in this section, and you can take a look at the Breadstick Shaping Video to see how they are made. Simply roll out the dough you’ve set aside from your baguette making to about ¼ inch thick. Using a pizza wheel-cutter, slice the dough into ½ inch strips (don’t be too fussy about shape, irregular is better), place them on oiled parchment paper, spray the strips with water or oil, and sprinkle on your choice of sea salt, spices or poppy seeds in any combination. Loosely but completely cover the sheet pan with plastic wrap, and let the sticks rise for the same time as the baguettes. A little longer won’t hurt. Place the sheet pan on the hearth, steam briefly, then seal the door. These will bake in a flash. Check after five minutes. If the tops show good color, and the sticks have risen well, remove them immediately. Again, be patient with cooling. These are best eaten the same day as they are baked. Four baguettes made from this recipe are shown in the foreground, surrounding a jug full of breadsticks made from the same dough.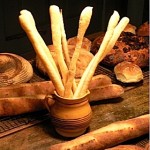 Baguette Shaping Part One Video
Baguette Shaping Part Two Video
Baguette Shaping Part One Video
Baguette Shaping Part Two Video
This is a versatile dough that can be made into rolls or breadsticks. The technique for forming rolls is shown under the Kaiser recipe later in this section, and you can take a look at the Breadstick Shaping Video to see how they are made. Simply roll out the dough you’ve set aside from your baguette making to about ¼ inch thick. Using a pizza wheel-cutter, slice the dough into ½ inch strips (don’t be too fussy about shape, irregular is better), place them on oiled parchment paper, spray the strips with water or oil, and sprinkle on your choice of sea salt, spices or poppy seeds in any combination. Loosely but completely cover the sheet pan with plastic wrap, and let the sticks rise for the same time as the baguettes. A little longer won’t hurt. Place the sheet pan on the hearth, steam briefly, then seal the door. These will bake in a flash. Check after five minutes. If the tops show good color, and the sticks have risen well, remove them immediately. Again, be patient with cooling. These are best eaten the same day as they are baked. Four baguettes made from this recipe are shown in the foreground, surrounding a jug full of breadsticks made from the same dough.
 Baguette Shaping Part One Video
Baguette Shaping Part Two Video
Baguette Shaping Part One Video
Baguette Shaping Part Two Video