


Boule au Levain
Dec 30, 2011Print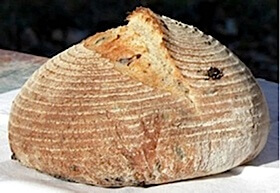
This recipe constitutes graduation day. The formula uses a wild yeast starter and a long, cool rise to develop maximum flavor from the grains. Often called a sourdough, barm or levain, there are many, many ways to cultivate a wild yeast starter. Some seem to involve voodoo or late night incantations. Neither is remotely necessary, and simple is better. The easiest and most successful method to propagate the yeast and bacteria cultures needed for characteristically sour breads is contained in Peter Reinhart’s The Bread Baker’s Apprentice, p. 229-32. Making the seed culture takes four days, but the amount of time involved is miniscule. The seed culture is then turned into a barm that, cared for properly, will last indefinitely.
On our Resources page, you’ll find a source for purchasing dried sourdough starters. Although there is a lot of talk about the superiority of one dried starter over another, it’s important to know that once you hydrate it and expose it to the air in your kitchen, the dominant yeast strain in your area will take it over eventually.
For a donation to your favorite local charity, he will send you a free portion of his starter. Although our methods differ somewhat, Jack is a master baker, and this thread will also introduce you to his very well illustrated demonstration on artisan bread baking. Joining the eGullet Society is free and highly recommended.
Boule au Levain
Ingredients
- 1 lb 2 oz filtered, bottled (no salt added) or spring water at 70oF
- 12.5 oz barm/white sourdough starter
- 2 lb 2 oz unbleached hard bread flour
- 1/2 cup raw wheat germ
- 3 tsp sea salt
Instructions
Day One
- Add the water and barm to the bowl of your mixer. Mix with the dough hook for a minute or so, until the water turns white. Add the flour and knead for four minutes. Cover the bowl and let the dough rest for 20 minutes. Add the salt and mix for about 4 more minutes. The dough should feel resilient, soft, and register between 76-78ºF. Turn out onto a lightly floured counter and knead by hand about 2 minutes using the method shown in our hand-kneading video clip. The dough should be tacky, but not sticky. If it is, knead in a bit more flour. It should pass the windowpane test. Bear in mind that this is a fairly high-hydration dough, so do not knead in so much flour that you make the dough stiff. It’s quite alright if it requires a bit of effort to separate the palm of your hand from the dough (something like peeling off masking tape, but not quite so sticky), as long as bits of dough do not stick to you hands.
- Turn the dough into a large oiled bowl, mist the top of the dough with spray oil and cover tightly with plastic wrap. Proof at room temperature for at least 4 hours, or until the dough has doubled in volume. Until you’ve made this bread several times, it’s best to pull off a portion about the size of a small orange and put it in an oiled, straight-walled glass beaker. Mark the original level with one piece of tape and the doubled level with another. Once you’re sure that the dough has doubled, you can simply slip this under one of your scaled pieces of dough to bring it up to weight with the other one.
Forming
- Turn the risen dough out onto an unfloured counter. Cut into two equal pieces by weight. Drop each piece on the counter a few times to deflate the dough a bit. Tuck the corners under to form a rough circle, then cover the pieces loosely but completely with plastic wrap and let rest for 15 minutes. While they’re resting, lightly but completely flour your banneton rising baskets using a fine sieve. Alternately, use the type of round wicker baskets found in restaurants. These should be lined with linen that has been misted with spray oil and dusted with flour.
- Form the dough into round hearth loaves as shown in our Boule Forming Video. Care should be exercised to turn the edges of the hands under as the dough is rotated to give you enough surface tension. Neither the counter nor your hands should be floured at this point. Gently turn the rounds into your rising baskets, seam side up, and pinch shut any open seams. Mist the seam sides with spray oil and cover each basket completely with cloth to avoid forming a crust on the dough. Proof at room temperature for about 2 hours, or until the loaves rise about 1 inch.
- Remove the cloth, wrap each basket completely and tightly in plastic wrap and refrigerate overnight.
Day Two
- Take the boule out of the refrigerator 2 to 2 ½ hours before you plan to bake, so they continue to proof. Remove the plastic wrap and cover the baskets completely in cloth while the loaves warm up. The interior temperature should be 58o F before they go into the oven. Alternately, if you’re in a rush, you can go directly from the fridge to the hearth, but your bake time will be increased.
- Steam the oven for 10 seconds, 10 minutes before baking. Dust your peel(s) with brown rice flour. If you’re using banneton, run your fingers around the upper perimeter of the loaves to allow them to release easily. Invert the baskets to release the loaves onto your peel(s). If you’re using linen-lined baskets, just peel off the cloth. Take your time here; it’s not a race. Slash or dock each loaf as shown in our short Loaf Docking Video.
- Load the loaves onto a 550ºF hearth, steam again for 10 seconds and seal the door. At the 20 minute mark, crack the door to allow the steam to escape and the crust to develop. Bake for 2 minutes longer. After 22 minutes, take the temperature of one loaf: it should read at least 205ºF. Return them to the oven with the door off for a minute or two if you haven’t reached that temperature or above.
- Cool completely on wire racks before slicing. Because of the acidity in wild yeast dough, these loaves will last three days at room temperature in a paper bag. They freeze with good results.
Notes
Show here is a variant of this recipe that includes brine cured olives, Kalamata olives and fresh thyme, all kneaded into the dough during the last two minutes.