

What We Learned
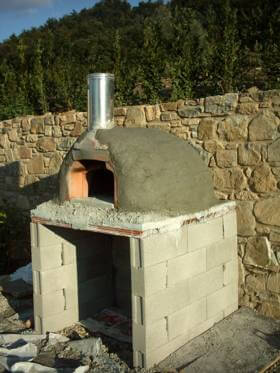
First stucco coat
Lesson Taken From the Firenze Oven
The lessons we learned from the Firenze Concept Oven are useful in many ways. For the homeowner, the project shows that oven installation does not have to be scary, time-consuming or expensive. For professional builders, I think the trade-offs we discuss bring value and insight. And for Pompeii builders, the lessons learned on either side of the oven assembly itself are fully applicable.
Timeline
The oven installation project flew forward. The oven chamber was fully assembled, insulated and covered with the first coating of stucco in less than 8 hours spread over three days, and the oven was finished in about 9 man hours of labor.
The timeline worked out as follows:
| Assemble stand | 1.5 |
| Pour concrete hearth | 1 |
| Pour vermiculite hearth | 1 |
| Assemble and seal oven | 1 |
| Vermiculite insulation | 1.5 |
| First stucco coat | 1.5 |
| Final stucco coat | 1.5 |
| Total | 9.0 |
Insulation
The installation does a very good job of holding heat inside the oven, and we rarely feel any heat above, below or on the side of the Igloo — even after hours of firing and cooking. The oven has a 2″ layer of vermiculite concrete below the cooking floor (6:1 ratio), and 2″ – 4″ of vermiculite concrete over the dome. We used an inexpensive insulating blanket that was stocked by our local building supply store for ovens. I was not able to ascertain exactly what it was but am certain that it is not as efficient as the woven ceramic blanket we provide with our ovens in the U.S. and U.K. Even with these limitations, the oven is well insulated.
We can confidently say that an oven insulated with the ceramic blanket that is provided with the Casa, Premio and Ristorante ovens, along with 4″+ of vermiculite will be very well insulated.
Oven Performance
We are very happy with how the oven heats up, holds heat and cooks. We have used it for both high-heat, high volume pizza cooking as well as longer, slower roasting and large volumes of bread — and everything in between. The 35.5″ (90cm) cooking floor is ample for many requirements though we would have preferred a larger oven at Thanksgiving.
We did not coat the oven with extra refractory, which will improve bread baking and roasting capability , but we are still able to bake two batches of bread (with the oven not fully loaded) from a single firing — which is outstanding. We can bake more bread than any family could eat by baking once a week.
We also have not found that oven floor gets too hot, either for pizza or bread baking, and that the oven floor does a good job of holding heat — despite the fact that we set the floor directly on the vermiculite layer. The conclusion we draw from this is that both methods work well and that there is little risk of getting the hearth design wrong. If there is a small trade-off to consider, it might be that putting the oven floor directly on the insulating layer will help the oven heat up slightly faster, and that putting the oven floor on the concrete layer will help it hold heat slightly longer for bread and roasting.
For a majority of owners, our recommended method of placing the insulating layer under the concrete layer is easy to build and offers good general purpose oven performance.
Oven Footprint
By limiting the oven landing to 4″, and the vermiculite layer to 3″ – 4″, we were able to pack a lot of oven into a small space — without compromising performance. Our 35.3″ oven fit in a 48″W x 49 1/2″D space.
RefMix
We also learned that RefMix is a wonderful product. It is pre-mixed so that you only have to add water and it is ready to use very quickly. It spread smoothly and did a good job of sealing the oven and the vent. It was workable long enough to easily close all of the oven joints, then it set quickly. We had an autumn shower while I was working on the oven assembly, which was not a problem for the RefMix.
The next day, I lit a newspaper to ensure that the oven was drawing properly and that there were no cracks for the smoke to escape, and the oven performed perfectly.
Costs
In addition to cutting installation time, we were also able to control installation costs. The installation price came out at around $200:
| Units | Price | Total | |
| Stand blocks | 32 | $1 | 32 |
| Terracotta beams | 5 | $2 | 10 |
| Concrete for hearth | 3 | $4 | 12 |
| Wire mesh | 3 | $3 | 9 |
| Vermiculite for hearth | 1 | $18 | 18 |
| Vermiculite for dome | 2 | $18 | 36 |
| Insulating blanket | 2 | $4 | 8 |
| Rough stucco for dome | 3 | $4 | 12 |
| RefMix | 2 | $20 | 40 |
| Finish stucco | 2 | $16 | 32 |
| Total | $209 |
The price of tools was less than $5 for a level and a trowel, and all framing and form materials were found on-site, and I used a hammer and pair of pliers we had previously purchased.
Click here to see the Installation Pages.