

Hearth and Stand
Block stand, form and hearth
Introduction
The stand and hearth hold your oven in place, forming a rigid platform for the oven floor. The stand legs can be constructed for a wide range of materials, from metal to concrete blocks. The insulating hearth spans the space between the stand legs and provides a level surface on which the oven floor and dome rest, and a covered area to store wood below. The insulation in the hearth enables your oven to retain heat inside the oven chamber and stops it from “leaking” out the bottom
When I built by fire oven a number of years ago, I spent weeks building the stand and hearth, constantly worrying, and it was only later that I came to realize that these elements are only a means to an end, not an end in themselves. In fact, all of the work that you put into the hearth and stand will be completely hidden by your oven finish. Even more, minor mistakes you make at this point can typically be repaired during subsequent steps.
The underlying objectives for the stand are that the legs are level and square and that the hearth they form is a plumb. To read more on our recommended hearth and stand dimension, click Here.
Building the Hearth and Stand
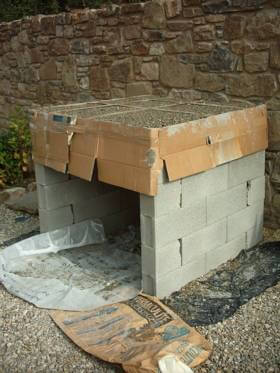
Our hearth was based on a 2″ layer of wire reinforced concrete, topped with a 2″ layer of vermiculite insulating concrete. The oven floor was placed directly on the insulating layer. This is the opposite of a traditional hearth, where the insulating layer is poured below the concrete layer.
We assembled our stand and hearth in about 2 1/2 hours. This speed was based on a couple of assumptions:
1. We placed our stand directly on a compacted earth and gravel driveway. We do not recommend this approach for most installations. If you already have a concrete patio or pad where you can readily set you oven, this will, of course, save you time.
If you do not, you might want to consider paying a professional to pour a simple foundation for you. It is not difficult, but it takes up time and energy that could go into your oven. I have seen builders become burned out working on the pad and stand, long before they even start building the oven itself. Regardless, do not let the oven pad, or foundation, stop you from making it to the next step.
Also, if you are in a deep frost region, consult a local professional to make sure your pad will gracefully survive the winter.
2. We dry stacked our concrete blocks. We recommend that most builders do this as a standard method. You should pour concrete into the block cores of the four corners of your stand, and you should consider using a strong wall coating for your block stand. We used a high-grade concrete to coat our stand.
Some vendors recommend that you build two legs for the stand, but we have found that it is easy to build a U shape from the blocks and that the extra blocks and time spent building the back wall are worth it. In fact, we retro-fitted the back wall of blocks on this oven, after experimenting with only two legs.
3. Our hearth was framed using terra cotta beams, which are easily found and very inexpensive in Italy. They are often used on porches, roofs and other load bearing projects. Under the advice of a builder, we covered our beams with 2″ of concrete, with an embedded wire mesh to create rigid platform, which we then topped with 2″ vermiculite concrete.
If you know of a product similar to this in the U.S., let us know. We are also working on a metal hearth tray with will serve a similar purpose.
4. We framed the hearth sides with cardboard boxes, held in place with strapping tape and set with a level. Typically, the hearth is framed with 2″x6″ or similar material though it did work using a common “found” material.
5. You might notice that our concrete blocks appear thin. These were 4.8″W x 7.9″H x 19.6″D blocks. The typical block found in the U.S. is 8W”x8W”x16″D, and the extra width is useful for balance.
6. We experimented with hearth height, and used five courses of blocks, plus the height of the hearth (about 5.5″) and oven floor (2″), giving us a hearth set at about 45″. It is a little high, but I have found it easy to work in the slightly higher oven.
Click to go to the Oven Assembly page.