

How To Cure Your Pizza Oven
Note:
If you own a Forno Bravo commercial oven (Roma, Professionale, Modena, or Napoli) with the gas burner, follow the curing instructions with gas or wood outlined on pages 22-23 in the Installation Manual instead. Please follow all temperature guidelines in the manual carefully; overheating your oven too early in the curing process can cause cracking.
Introduction:
When made, your Forno Bravo oven has moisture that need to be slowly baked out of the refractory. Doing so properly will make make the dome stronger, allowing it to reach over 1,000°F.
But, if the oven gets too hot too fast, the water can escape the dome’s thickness simultaneously which can cause cracking. Follow the curing instructions below to make sure that your oven will perform well when it is time to make delicious meals.
Important notes for modular kit builds:
- Apply your insulation and stucco for the following reasons:
- To prevent heat loss while curing
- To minimize fire hazard
- To minimize cracking on the stucco
- Let your oven sit for a week. It doesn’t matter if it rained during that week; moisture often helps the natural strengthening of the refractory material.
Curing Instructions (Fully assembled and kit builds):
1. Place and maintain the fire at the center of the dome.
- Avoid placing it on the sides or the back to prevent the fire from touching the dome directly and raising temperatures too high.
- Avoid over heating your oven especially on day one and two to prevent cracking.
2. Cover the oven mouth but leave a small opening.
Position the door to act as a windbreak, leaving about a 1-inch gap once the fire is started. Rest the door on its handle. This setup helps:
- Ensure an accurate temperature reading on the gauge.
- Direct smoke upwards through the vent.
- Slow down the wood burning process at lower temperatures, preventing impurities from burning off too quickly.
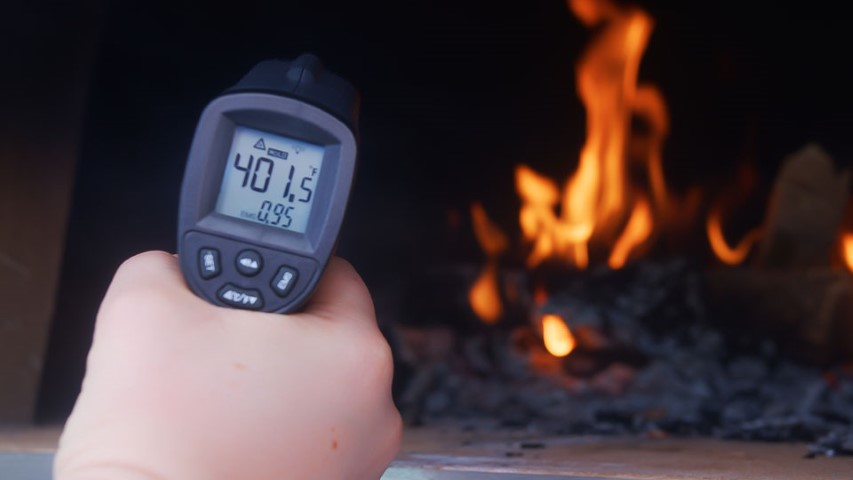
3. Get the oven to its appropriate temperature.
With a Digital Infrared Thermometer, measure the temperature at the highest point inside the oven, which is the dome. This spot will be the hottest in the brick oven. The temperature can vary slightly, but try not to exceed the temperature for that day’s cure schedule by more than a few degrees; it’s better to be 20°F cooler than hotter — especially on day one and two.
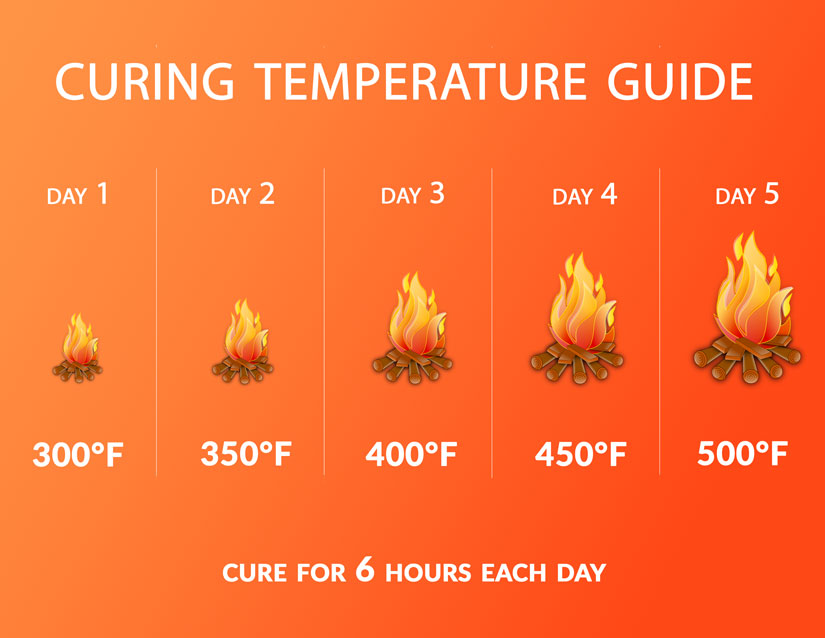
Day 1: 300ºF (149°C) for 6 hours (longer is better)
Day 2: Repeat process at 350ºF (177°C)
Day 3. Repeat at 400ºF (204°C)
Day 4. Repeat at 450ºF (232°C)
Day 5. Repeat at 500ºF (260°C)
Important Notes:
- For day 1 and 2, use small wood pieces. They easily catch fire, keeping the heat you want, but reduce the risk of overheating the oven.
- DO NOT USE charcoal, pressure treated lumber, chipped wood products, sappy wood such as pine, laminated wood, or any material other than dry, medium- or hard-firewood.
- DO NOT USE liquid fuel (firelighter fluid, gasoline, lantern oil, kerosene, or similar liquids) to start or maintain a fire.
- Do not use products not specified for use with this oven.
- NEVER USE WATER to lower the temperature inside the oven, or to extinguish the fire. This will increase wear and tear on your oven and can lead to “spalling,” pitting, and cracking your floor tiles.
- You can start the fire with an acetylene torch if you have one handy.
- Food grade fire starters are considered acceptable aids when starting a fire.