

Starting the Oven Dome
Overview
The top of the Pompeii brick oven is a circular parabolic dome built from brick. The dome shape is designed to efficiently absorb heat from a wood fire, and to evenly reflect stored heat, and heat from a live fire inside the oven, down to the cooking surface.
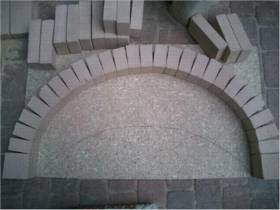
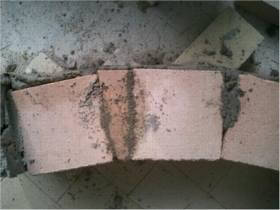
Figure 1 provides a good overview of the dome layout, including the first chain of upright bricks, the curve of the dome, and side view of the oven opening. Figure 2 shows a cross section of the curvature of the arch, and gives you an idea of the inward angle that you will build.
To Form, or Not to Form
There are two fundamental ways for how to build a pizza oven dome: the first is a free-standing dome, where “chains” of self-supporting brick circles are built on top of one another. The inward angle of the dome curve can set set either freehand, or with wooden shims. The second method uses Styrofoam forms, which determine the oven dome’s inward angle, and are removed after the dome is completed. Both methods have advantages, and both are vastly superior to the old-world method of mounding wet sand as a form.
The free-standing dome approach has a number of advantages. It is a relatively easy and very time-efficient method, which we think is within the skill set of someone who is ready to build a brick oven. Additionally, because the brickwork is accessible from the inside the entire time the dome is being built, it is possible to continually check the dome for the accuracy of the brick laying at all times. You can continually clean the inside of the dome brickwork, which will result in a better-looking end product.
This approach also reduces the risk of something going wrong. Simply put, you know the entire time that you are working that your oven dome is standing, and will continue to stand. Any time you produce brickwork based on forms, you are faced with the moment of truth, where you remove the form, and hope that the oven doesn’t fall down. I have personal experience with this, where the first course of arched bricks on my rectangular, barrel vaulted oven fell in three times before I finally got it right.
The free-standing dome approach builds on itself, where the first few chains are not difficult to build, giving the builder the experience and self-confidence necessary to continue through the subsequent chains.
Alternatively, the Styrofoam form method makes it easy to follow a pre-defined inward dome curve and oven shape, and it eliminates the need for shims. This method also gives you good internal access to your brickwork for checking and cleaning. Styrofoam itself is easy to find (Home Depot or Lowes), easy to work with, inexpensive and it easily breaks out of the oven when you are finished with the dome — unlike the complicated, hinged wooden forms that some professional builders use. See photo
It is also possible to build your oven using both methods, where you build the first 5+ chains using the freestanding methods, then building forms for the final chains that close in the oven dome.
To discuss the pros and cons of the two methods further, before you start you oven, join the Forno Bravo Forum, and see what other builders have done, and what they think.

Oven Dimensions
We recommend either a 36″ or 42″ (internal diameter) round oven, using either a high (Tuscan), or low (Neapolitan) vault design. These sizes provide you with enough oven space to cook multiple pizzas at a time, or to cook a roast with multiple side dishes, without being too large or difficult to build, or too slow to fire. The trade-offs between the two oven styles is described below, and will help you decide which oven to build.
| Interior Diameter | Interior Height | Opening Width | Opening Height | |
| Low Vault | 36 | 14.5″ | 18 | 10 |
| 42 | 15.5″ | 19 | 11 | |
| High Vault | 36 | 19″ | 19 | 12 |
| 42 | 20″ | 20 | 12.5 |
Oven Style
There are two basic styles of Italian wood-fired pizza oven: the Neapolitan oven, which has a more aggressive curve and a lower dome height, and the Tuscan oven, which has less aggressive curve and a higher dome. While both oven styles perform well with all types of cooking, it is said that the Naples-style oven is more tuned to pizza, where the lower dome heats up a little faster and gets hotter for cooking pizza.
The higher dome of the Tuscan-style oven is more efficient at holding heat, and uses less wood, has a larger door opening for larger roasts and pans, and is better for cooking bread and roasting. It is also true that the higher dome is somewhat easier to build, as the inward curve is less pronounced, and the risk of a chain of bricks falling in before they are locked in place with a keystone in less.
It is our view that the differences between the two oven styles has be exaggerated by some vocal folks, and that you will be extremely happy with either of the outdoor brick oven plans, or your own hybrid between the two.
Regardless of which style you choose, the parabolic oven vault shape serves to evenly reflect heat down on the cooking surface. Note that the diameter of your oven does not have to be exactly 36″ or 42″, but rather the nearest size that you reach without cutting bricks. Build a model on a flat space to get your exact measurement for the bricks you are using. Do not allow space for a mortar joint, as you will be setting the edges of the bricks facing inside the oven flush with each other.
The Oven Opening Dimensions
The basic trade-off a builder faces when selecting the oven opening size is balancing the ease-of-use for getting food in and out of the oven and the size of pans, oven tools and roasts you want to use vs. your oven’s ability to hold and retain heat. The larger the opening, the easier it is to work with the oven, and more your oven will lose heat. A small opening will enable your oven to hold its heat well, but can limit you from using your favorite terra cotta pan, or a nice large pizza peel. The opening height and width we recommend here should work well for a majority of builders.
How To Build A Pizza Oven Dome
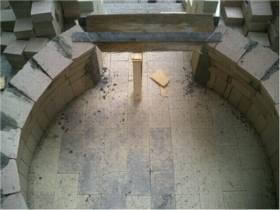
To set the position of your oven on your hearth slab, first measure and mark the center of the slab from side-to-side (left/right) and the center of your oven floor back from the oven landing and vent landing. Then, using a string and marking pen, build a compass half the diameter of your oven (18″ or 21″), and mark the circumference of your oven floor.
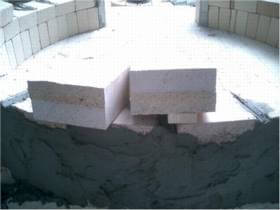
The dome itself a series of self-supporting circular brick chains that curve inward, until they meet at the keystone at the oven top. The first chain is a ring of brick cut in half and standing on their ends, with the thin edge (2 1/2) facing inside the oven. You can adjust the exact diameter of your oven to match the size circle that your bricks form, so that you do not have to cut a brick in your first chain.
The subsequent chains are made up of brick cut in half and set on their wide edge (4 1/2″) with the clean edge facing in. The angle of the inward curve is set using a standard wooden shim. To determine the angle of your oven’s inward curve, and of the shim itself, build a trial layout as shown in graphic 2 and cut your shim accordingly. Do not allow space for a mortar joint, as you will be setting the edges of the bricks facing inside the oven flush with each other.
Begin laying your bricks using High Heat Mortar. The bricks will follow the angle and curvature set by the wood shim. After the angle is held in place with mortar, remove the shim; fill the open space created by the shim with mortar, and move on.
Start each chain either next to, or over the oven opening. This will allow you to set you keystone where it cannot be seen when you look inside the oven. The keystone is a specially cut brick that locks each chain into place. When you reach the end of each chain, where you cannot fit the last full-size brick, make a paper template of the piece that is required to finish the chain. Transfer the template to your brick, and make your cut. The keystone should be tight, and require that you lightly tap it into place, but not so tight that it causes the rest of the bricks in the chain to shift.
Oven construction is done without any forms or bracing through the first six or eight (out of 10-12) chains. How far you can get without forms is up to you, and will depend on the angle and specifics of each oven.
Building the Oven Opening
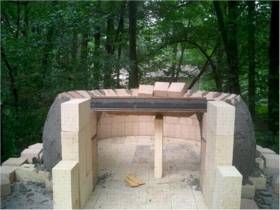
There are four traditional ways for framing your door opening, though we recommend the first, and easiest method. The easiest, fastest and least costly way of framing the pizza oven opening is to use standard size bricks to frame the side of the opening, and a length of 2″x 2″ x 3/16″ angle iron to support the top of the opening.
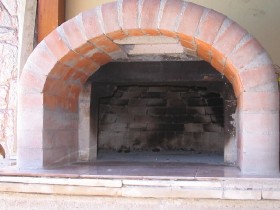
The other methods are: building a curved arch using bricks to frame the opening; building (or having a metal fabricator build) a complete door frame built, either from steel or cast iron; or framing the opening with stone lintels. The curved arch method is beautiful, but difficult to build. Because the oven opening tends to a little black and sooty, we aren’t sure it is worth the effort. Having a welder build a door frame that also integrates your oven vent is something you might want to consider if you have access to a good fabricator. The stone lintel approach is authentic, and will look great, but you are on your own when it comes to finding the right material, and it can be tricky making your outdoor brick oven plans work with the non-straight lines of the stone.
An update! We recommend that you set back the vent side bricks back 1/2″ to allow for a reveal that you will use to “form” the opening into the oven. You need to leave a lip that your door can close tightly against, fully sealing heat and steam inside the oven chamber, and completely cutting off the air supply. With this mind, Photo 11 shows the vent walls in line with the pizza oven, not set back, as we recommend.
About your Bricks
We recommend using low duty firebrick for both the oven dome and cooking surface. The firebricks that make up the dome provide a majority of the oven’s ability to hold heat, and will allow the oven to deliver the high temperatures that are needed for cooking pizza. Check out our Brick Primer for more background information on bricks.
Much of the Pompeii Oven dome is constructed using a standard size brick (about 2 1/2″ x 4.5″ x 9″) cut in half. The cut side of the brick faces out, away from the inside of the oven, allowing the clean, manufactured side of the brick to face in where it will be seen. Depending on the brick type and size you choose, the thickness of your oven dome will be between 4″ and 4 1/2″, which is the right amount of thermal mass for a home oven. The dome will be coated with 1/2″-1″ layer of either refractory mortar or fire clay mortar, further increasing the oven mass.
You are ready to close in, and Finish your Oven Dome.
Or, go to the Table of Contents for an overview of what is coming up.
Tips and Hints
There are three ways of cutting the bricks for your dome: you can either purchase an inexpensive tile saw (see Materials List for ideas) or rent a tile saw; you can use a diamond-coated masonry blade on a standard circular saw or grinder (see Materials List for more information); or you can score your bricks and break them.
You can either purchase pre-mixed refractory mortar, or mix your own fireclay mortar. Read our High Heat Mortar Primer for more information.
1. The dome layout.
2. Basic dome shape.
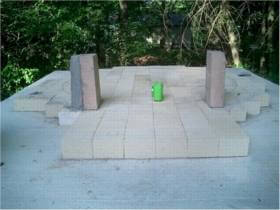
3. Set the oven opening.
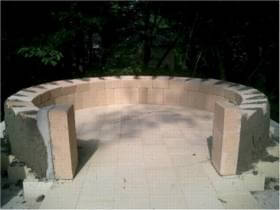
4. Walls and first chain.
5. Shim sets dome angle.

6. Styrofoam forms.
7. Keystone locks the self-supporting chain.
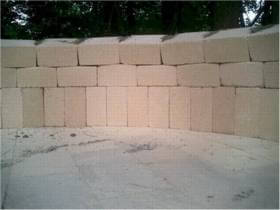
8. Second chain.
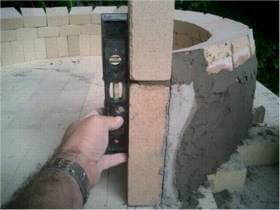
9. Set and level door jam.
10. Form for oven opening at third chain.
11. Opening and vent sides.
An update. We recommend that you set back the vent side bricks back 1/2″ to allow for a reveal that you will use to “form” the opening into the oven. You need to leave a lip that your door can close tightly against, fully sealing heat and steam inside the oven chamber, and completely cutting off the air supply.
11a. This oven shows how the vent walls are set back from the oven opening, leaving a door jam where you can tightly close a door.
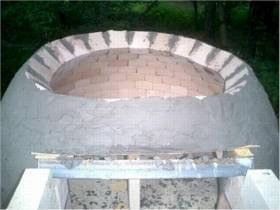
12. Sixth chain. Still no form