

Foundation Slab
Overview
The Foundation Slab is exactly that — the slab on which your oven stand and oven chamber will sit. We recommend a 5 1/2″ reinforced concrete slab framed using either inexpensive 2″x6″ studs, or material you already have that can be cut to size.
The brick oven concrete slab dimensions listed below are 8 ” wider than the dimensions of your concrete block stand, providing you with 2″ for finish material, and a 2″ reveal on either side of the stand. The slab is also 10″ deep, allowing for 4″ in the back (2″ finish and reveal), and 6″ in front (the additional space makes a nice edge for your wood storage). The pizza oven foundation slab will also be used to support forms that you will use during the hearth slab construction. The finished top of the slab should be 2″-3″ above ground level.
The recommended dimensions of the foundation slab and block stand for the size of your oven are as follows (check back for more sizes):
| Oven size | Foundation | Block Stand |
| 36″ | 71″ x 80″ | 63″ x 70″ |
| 42″ | 77″ x 86″ | 69″ x 76″ |
Click on the building material pages to see a list of what is required to construct your foundation slab.
Instructions
Excavate your pizza oven foundation (Photo 1), then frame the slab with 2″x6″ lumber set to the correct height. Check to make sure that the longer stud sits inside the shorter stud, and that the frame opening is the right dimension. If necessary, hold the frame in place with wood stakes. Make sure the frame is level and square, and that it faces exactly in the direction you want.
Lay a 3″ base of pea gravel (or crushed rock), compact the rock (Photo 2), and cover it with a layer of 6ml plastic sheeting to stop the slab from wicking water.
Place a sheet of wire mesh inside the foundation frame, and install a two-piece grid using 1/2″ rebar (#4) set 4″ and 8″ inside the foundation frame. Tie the rebar together with tie wire, then set the wire mesh and rebar half way up the pad (2 3/4″), using either rebar stand-offs or fragments of brick (Photo 3).
Mix your concrete (Photo 4), then pour (Photo 5) and level. Use a 2″x4″ to screed and level the concrete, then finish to a smoothness that works for you as the bottom of your wood storage area. Allow the slab to cure for a day or two.
You are ready to continue to the Block Stand.
Go straight to the Table of Contents page.
The foundation work on this oven was done in 8 hours.
Hints and Tips
Use a tiller to break up the ground before you excavate. You can rent one from Home Depot. If your ground is hard and/or dry, water it with a sprinkler for a couple of days before you start. Your site should be soft, but not muddy.
Compare both diagonal measurements of your foundation frame to ensure that your foundation is square. Double check that your foundation really faces the exact direction you want you oven to face.
The volume of concrete in the foundation can be heavy (40 80lb bags or more), and mixing it by hand in a wheelbarrow might use up energy and time that will serve you better later in the project. Rent a mixer from Home Depot, and ask a friend (or pay a local teenager) to help you mix and pour the slab.
Remember that while the brick oven concrete slab has to be square, level and structurally sound to get your oven off on the right foot, it will never be seen. It is worth saving your best finish work for later in the project and don’t be afraid to go fast at this stage.
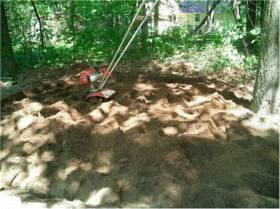
1. Excavation using a tiller.
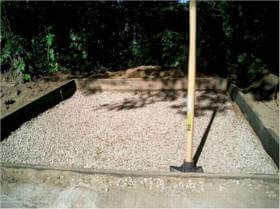
2. Compacted gravel base.
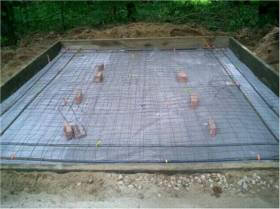
3. Wire mesh and rebar reinforcing.
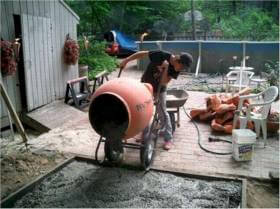
4. Rent a mixer to pour the slab.
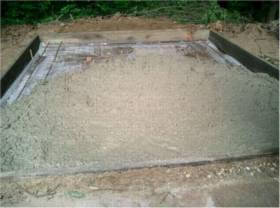
5. Half poured. Two hours to pour in total.