

The Stretch and Fold Method
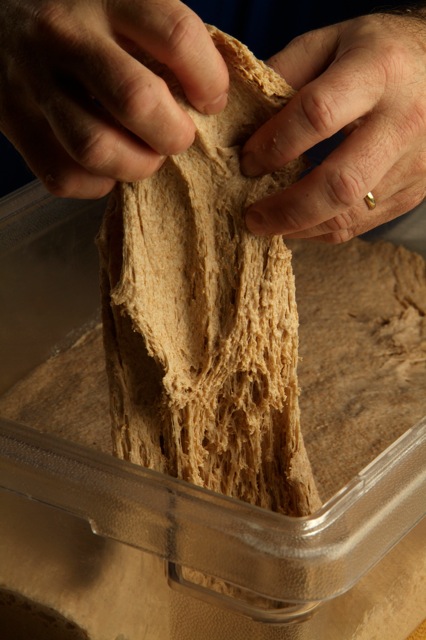 In some of the recipes that we’ve posted I refer to stretching and folding the dough, so I want to more fully explain it here, as I will continue to provide recipes that utilize this technique. The stretch and fold method (S&F from here on), is a remarkable way to maximize gluten development in a dough with minimum mixing time. It is sometimes referred to as “intermittent kneading” and also by the term “folding.” All of these refer to a similar method, though the time intervals may vary from recipe to recipe. In short, it means to intermittently fold the dough over onto itself during the fermentation stage. What this accomplishes is to strengthen the bonding of the gluten protein threads that hold the dough together and thus trap the carbon dioxide created by the yeast. This is what creates the bubbles or air pockets that we refer to as the “crumb” in the final bread.
I suggest this technique more and more often in my classes and recipes, as it allows us to more fully hydrate the dough, almost to the point of over-stickiness, yet still create a very workable, dynamic dough, one that pops in the oven and creates more of the large irregular holes that artisan bakers (and consumers) love to see. The method is actually quite simple and I have short video that illustrates this at: http://www.youtube.com/watch?v=1timJlCT3PM .
To work with sticky dough many bakers use flour on the work surface and on their hand, but I prefer to use an oiled work surface (either olive or vegetable) and either oil my hands or dip them in water (sticky dough won’t stick to wet or oily hands). All you have to do is to transfer the dough from the mixer to the oiled work surface, pat it into a rectangle or ball, and then pull, or stretch out about half of the dough from one side and then flip the stretched piece back over the top of the dough, about to the middle. Then repeat this from the other three sides, stretching and folding half the dough back over the top of the dough. Then, when all four sides have been folded over, flip the whole dough ball over so that the smooth underside is face up and the folded top is underneath. At this point, you either place the dough into an oiled container or leave it on the oiled work surface and cover it with a bowl. (As I said, some bakers prefer to work with floured surfaces instead–that is totally up to you.)
You can repeat this S&F at 5, 10, or even 45 minute intervals, depending on your baking schedule for the dough in question. For same day bakes, three or four S&F’s at 30 to 40 minute intervals are common, which allows the dough to ferment in between the S&F’s. For overnight dough, such as pizza or focaccia or certain rustic bread formulas, the S&F intervals can be as short as 5 minutes. Typically, four S&F’s are sufficient to fully develop and firm up the dough, but some doughs require only one, while others might require five S&F’s if they are very wet.
This technique greatly enhances the oven spring and causes the dough to achieve a kind of bounce and liveliness that is hard to replicate by conventional mixing methods. It also allows us to push the envelope regarding hydration, sometimes making it possible to add as much as 5% to 10% more water than the recipe calls for. And most importantly, it’s also a lot of fun and gives great pleasure to watch and feel the dough get stronger and more vibrant with each S&F — yet another reminder that we’re working with a living, dynamic product.
Recent Articles by Peter Reinhart
- NY-Style Pizza, Marco’s Style, with Guests Kathleen Kennedy and Scott Wiener
- Grant Arons — Inizio and Finale — the Empire Grows
- Korshak is Back — this time with Hot Dogs!
- Leo Spizzirri and Moderna Bar and Pizzeria, Best New Restaurant Award
- The Blue Food Cookbook: Food that Comes from Water with Andrew Zimmern, Jennifer Bushman, and Bart Seaver
- Dutch Van Oostendorp and Blaine Parker: “Little Miss Margherita,” Documentary
Add Comment
You must be logged in to post a comment.
Pizza Quest Info
Resources
Vision Statement
Peter’s Books


...and other books by Peter Reinhart, available on Amazon.com
Hey Chef, we did the stretch and fold in class with very wet & sticky ciabatta dough. My students saw the dough strengthen right before their eyes!! The hole structure was fantastic as they dipped it into a mixture of olive oil and balsamic vinegar. Thanks!!
Thanks George–yes, it’s a great method and it’s really cool to see how the dough changes with so little effort. Keep up the great work!
Hi was wondering about some advice? so when you are making pizza dough at which point is it best to shape it into individual balls (or pats as i have heard them called also). you see if i let it rise first, should i then punch it down to get the air out then make the balls leave them to rise again then shape them into pizza pies. or should i just shape them into balls straight away before the initial rise and then shape them into pie,. but the problem there seems to be when it comes to shaping they are already to airy to be able from me to make pie shapes with out punching the air out again. i like my crusts to be nice and airy, will that effect then final pizza after its been in the oven? sorry for so many questions. the site is great, lots of inspiration for an amateur pizza maker and and full time mother.
thanks fiona
Hi Fiona,
I like to shape the dough balls shortly after the dough has been mixed and then place them in the refrigerator on an oiled and covered pan or box. The overnight chill down takes the place of the first rise–it is the first rise–and then you merely pull the pan out 90 minutes before baking the pizzas to take the chill off the dough balls and to allow them to ferment again, but not too much. The dough will spread and gas up slightly overnight and then some more during the warm up phase, but should still be easy to work with and will be nicely relaxed.
You can also put the whole dough away overnight and then divide it into balls about 2 hours before making the pizzas to take off the chill. It works well either way. What I don’t do is give the dough one rise, shape the dough balls, and make pizza soon after–the dough radically improves with the overnight rise/chill down. If you must make them on the same day, then at least allow for about 6 to 8 hours of fermentation time before making the pizzas. You can slow down fermentation by chilling the dough until you are ready to form the dough balls.
I have heard of some folks preferring to give the dough one rise before diving the dough balls and then chilling them overnight. It adds more fermentation flavor but could easily become too much fermentation if you’re not careful, which diminishes the caramelization browning of the crust. Try all of the approaches and see which one you like best and then make that your signature method. Please let us know which one you like best.
@Peter I love this method, picked it up from the “artisan bread every day” book. Its the only way to deal with wet ciabatta dough.
I’ve never tried it with pizza dough and I’d like to try. The recipe I use for pizza is a 65% hydration, not as wet as the ciabatta. For pizza, would I use the S&F to replace the usual kneading (5 minutes in a mixer) or do it after during the first dough rise? I usually do a 45 min first rise, then overnight in the ref.