

Focaccia Dough Recipe, Genoa-Style
Last week we gave you a recipe for caramelized onion marmalade that makes a killer focaccia topping when couple with walnuts and blue cheese. But any focaccia or pizza, no matter the quality of the toppings, is only as good as the crust, and this one is the best I’ve ever had, even better than in Genoa and San Francisco. See what you think and let us know.
.")
Peter’s Focaccia from The Fire Within Wood Fired Oven Conference, with carmalized onion marmalade, blue cheese, and walnuts (with a gratuitous sprinkling of edible nasturtuim petals).
Focaccia Dough, Day One
4 1/2 cups (20.5 ounces by weight)………….…unbleached bread flour
1 ¾ teaspoons (.33 ounces)……………………………salt
1 1/4 teaspoons (.15 ounce) ……………………..instant yeast
2 cups (16 ounces)……………………………….cold water
2 tablespoons (1 ounce) …………………………….olive oil
(Plus extra olive oil for oiling the storage bowl and the baking pan, about 1/4 cup)
Day One:
–Make the focaccia dough by mixing all the dough ingredients, except the olive oil, in a mixing bowl or the bowl of an electric mixer (you can add the instant yeast directly to the flour—it does not have to be hydrated first as you would with active dry yeast. See Notes below). Use the paddle attachment if using an electric mixer, on slow speed. Mix or knead for about one minute, until all the flour is hydrated and you have a coarse, wet, shaggy mass of dough. Add the 2 tablespoons of olive oil and mix an additional 15 seconds to coat the dough with the oil. Let the dough rest for 5 minutes, then resume mixing for 1 additional minute. The dough will be very soft and sticky, like ciabatta dough, but the gluten will be developed enough and the dough will be soft but bouncy. Place the dough in an oiled bowl, stretch and fold it from all four sides and flip it over in the bowl, cover the bowl (not the dough) with plastic wrap, and refrigerate immediately, overnight.
Day Two:
–Remove the dough from the refrigerator 3 to 4 hours before you plan to bake it (it will have nearly doubled overnight). Cover the bottom of a baking pan with either baking parchment or a silicon pad (aka, Silpat). Drizzle 2 tablespoons of olive oil over the surface and rub it around to coat the entire surface area of the pan as well as the inside walls.
–Transfer the dough from the bowl to the baking pan with a bowl scraper or rubber spatula that has been dipped in water. Drizzle 1 tablespoon of olive oil over the top and then use your fingertips to press and “dimple” the dough into the pan (begin from the center and work out towards the edges of the pan). Do not flatten it with the palms of your hands but only with the fingertips, to make these dimpled pockets in which the oil will settle. The dough will only cover about 2/3 of the pan before starting to spring back. Stop pressing and let the dough rest for 20 minutes, uncovered, to relax the gluten.

Dimpling the dough…
–Drizzle another tablespoon of olive oil over the surface and evenly dimple out the dough as in the previous step. This time the dough will cover nearly the entire surface but will probably spring back a little to cover 85% of the pan. Let it rest another 20 minutes.
–Drizzle another tablespoon of olive on the surface and dimple out the dough one final time. It will be nicely covered with “flavor pockets” and should cover the whole pan. If it recedes from the corners, don’t worry as it will fill the corners when it rises and bakes. Let the dough rise, uncovered, for two to three hours at room temperature. It will fill the pan to the rim. At this point, add the toppings, but not the cheese (other than wet cheeses like blue or feta or goat cheese–but other cheeses should be added only at the end of the bake–see below).
–Thirty minutes before baking, preheat the oven to 450 degrees (400 degrees if convection). Bake the focccia on the middle shelf for 10 minutes. Rotate the pan 180 degrees and bake an additional
10-15 minutes. Monitor the dough and bake until the top is golden brown. Also, use a pastry blade to check under one corner of the dough to be sure that the underside is also somewhat golden (caramelized). If the top is baking faster than the bottom, move the pan to a lower shelf. If the bottom is done before the top, move it to a higher shelf. When the focaccia appears to be nearly done baking, add the cheese and return it to the oven for an addition 3 to 4 minutes to melt it.

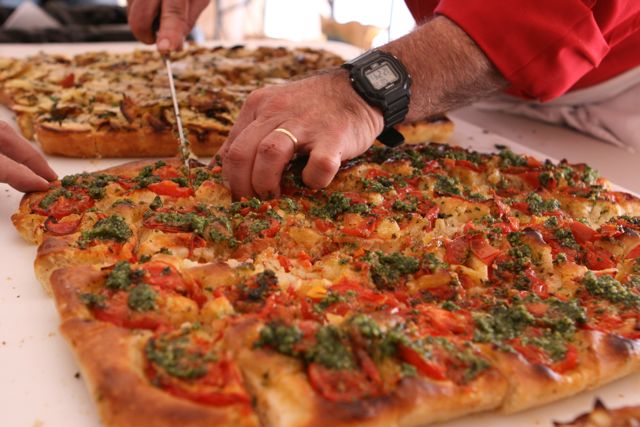
Focaccia with sliced tomatoes marinated in herbed olive oil and topped with pesto after baking.
–Remove the pan from the oven and break the focaccia’s contact with the walls of the pan by loosening it with a pastry blade. Wait three or four minutes and then transfer the focaccia to a cutting board. If the parchment or Silpat is still attached to the dough, simply lift the focaccia and slide the parchment out from under. If there is any extra oil in the baking pan, drizzle it over the top of the focaccia. Allow it to cool for at least 10 minutes before slicing with a bread knife (not a pizza roller) and serving. The focaccia pieces should be about 3/4” in thickness, perfect for topping with tapenades and spreads or pesto (see our pesto recipe, posted last week).
Notes:
–When mixing wet, sticky dough like this by hand, dip your hands or the mixing tools in cold water. Sticky dough won’t stick to wet hands or tools.
–Try not to press out all the air pockets when dimpling the dough in the pan. These pockets become the basis for the nice large, irregular holes in the finished product.
–If you only have dry active yeast, increase the amount of yeast to 2 1/2 teaspoons and hydrate it first for three or four minutes in 4 ounces of lukewarm water (subtract this water from the 2 cups in the recipe so that you are still using only 16 ounces of total water).
–When using wet toppings like pizza sauce or sliced tomatoes the focaccia will take longer to bake by about 5 to 8 minutes. Sliced tomatoes, by the way, really comes alive when garnished with fresh pesto after it comes out of the oven.
–Please let us know how this goes for you and also share your own favorite tips and toppings. Enjoy!!
Recent Articles by Peter Reinhart
- NY-Style Pizza, Marco’s Style, with Guests Kathleen Kennedy and Scott Wiener
- Grant Arons — Inizio and Finale — the Empire Grows
- Korshak is Back — this time with Hot Dogs!
- Leo Spizzirri and Moderna Bar and Pizzeria, Best New Restaurant Award
- The Blue Food Cookbook: Food that Comes from Water with Andrew Zimmern, Jennifer Bushman, and Bart Seaver
- Dutch Van Oostendorp and Blaine Parker: “Little Miss Margherita,” Documentary
Add Comment
You must be logged in to post a comment.
Pizza Quest Info
Resources
Vision Statement
Peter’s Books


...and other books by Peter Reinhart, available on Amazon.com
Peter, in # 7, you say you often pan the dough (as opposed to rising in bowl). Do you add the oil to the pan at this point? Won’t the oil be absorbed into the dough?
Yes, some of the oil is absorbed into the bottom of the crust, which only makes it better!!!
Thanks Peter! I tried it and it worked fine. Easier to spread out when chilled. I’ve been using this as a Sicilian Pizza base. It’s my son’s favorite now:)I used a Silpat and my husband proceeded to cut in squares along with the pie. lol
Why not mix some herbs (rosemary, thyme, garlic) in with dough??
i used active dry yeast, but i forgot to increase the amount of yeast. Will this ruin my dough?