

Getting Started: A Brick Oven Overview
Overview of the Brick Oven Construction
The Pompeii Oven is comprised of a number of basic components, which we will define here to give you a better understanding how you will go about building your oven. Click on these links to see directions for each step of the installation process.
Other resources include:
Click on our Anatomy of an Oven to see a graphic showing the various parts of the oven.
Click on our Thermal Mass Primer to learn more about how wood-fired ovens absorb and hold heat, and cook.
Click on our Table of Content to see the installation order.
The Foundation Slab
Your oven enclosure rests on a traditional wire mesh reinforced 5 1/2 ” concrete slab. It can be a stand alone slab built specifically to support your oven, or it can be poured to accommodate other outdoor kitchen items including shelves, grills, and tables. Your outdoor kitchen can, and probably will, evolve over time.
The Stand and Insulating Hearth
Your oven dome and cooking surface are set on an insulating hearth and stand built on your foundation slab. The insulating hearth is framed and poured directly on your block stand. The oven cooking floor should be set to a height where you can easily place and remove food — typically around 40 inches. The insulating hearth and the block stand are the same width and depth.
The insulating hearth serves three purposes, providing your oven with:
- a rigid platform which spans the opening between the stand’s legs, and above the wood storage area
- an insulation layer to stop heat from escaping through the rigid platform and down into the standing leg
- a smooth surface on which the cooking surface will rest.
The Cooking Surface and Vent Floor
Pizza and bread are baked directly on the oven cooking surface while other foods such as vegetables and roasts are placed in cookware. The oven landing sits just in front of your oven, under the vent. Additionally, you will want to build an additional landing area in front of the oven opening to provides a staging area for food that is being placed inside or removed from the oven.
The cooking surface should be built using high-quality firebricks, set on their wide side in a basket weave pattern so that the seams are staggered. This design provides a 2 1/2″ cooking surface, perfect for a home or garden oven. Because the bricks that make up the cooking surface can eventually wear out, or break, and can be easily replaced, they are fitted together and set on a thin layer of sand and fireclay, and not mortared in place.
Alternatively, you can purchase a round cooking surface from Forno Bravo. That advantage to the round cooking surface is that you can build your oven dome around, not on, the oven floor, which is a more heat-efficient approach. The round floor also saves time and presents fewer seams for cooking.
The owner or builder can also choose to install a larger oven landing using materials such as brick or granite, in front of the oven. The cooking surface is centered left and right on the hearth slab, with the oven dome built either on or around the cooking surface. Placement of the front edge of the oven floor depends on the depth of the oven landing, where the from of the oven butts up to the landing material.
The Oven Dome
The oven chamber is topped with a circular parabolic dome built from firebrick. The dome shape is designed to efficiency absorb heat from a wood fire, and to evenly reflect stored heat, and heat from a live fire inside the oven, to the cooking surface. The oven is constructed using a High Heat Mortar.
We would recommend using high-quality Firebrick for both the oven dome and cooking surface. The fire bricks that make up the dome provide a majority of the oven’s ability to hold heat, and will allow the oven to deliver the high temperatures that are needed for cooking pizza.
Also, as many oven builders have noted, the additional cost of buying the best firebricks is very low compared with the overall cost of the project, and the labor capital that is being invested.
Vent
Unlike a fireplace, where the chimney is inside the firebox in the back, the brick oven’s vent and chimney are outside of the oven — in the front. Typically, a steel vent is attached to the housing which encloses the oven chamber. We have posted a drawing of a typical metal vent, which you can have fabricated locally. Or, contact Forno Bravo, and we can provide one.
Vent Arch and Door
Your oven has two openings: one into the oven itself, and a second, optional opening around the oven vent and landing. Either or both can be decorated with a brick arch. For most installations, the opening into the oven itself can be built using standard angle-iron, producing a rectangular opening.
You can build your own door (we will post plans later), or if you build you door opening to a standard size, can purchase one from Forno Bravo.
Chimney
The top of the vent can then be connected to a modular chimney system. The type of chimney pipe you use depends on whether your installation is outside or inside, and on your local building codes. Typically, outdoor installations use a double wall metal pipe and Indoor installations use triple wall pipe. Attach a spark arrestor a the top of the chimney. Be sure to check you local building code prior to installation.
Dome Insulation
After the oven elements have been assembled, the oven is covered with insulation. Unlike thermal mass, where too much can be a bad thing, there isn’t really such a thing as too much insulation.
For Igloo installations, you cover the entire structure with 4″ – 6″ of vermiculite-based insulating concrete before finishing the entire oven with stucco.
For gabled house installations, cover your oven with 2″ of vermiculite-based concrete, then fill the housing chamber with loose vermiculite.
Oven Enclosures
There are two basic outdoor oven designs: the Gabled House and the Igloo, both of which give you a virtually limitless range of design options and finish materials. Oven structures can be incorporated with a range of outdoor kitchen elements, such as counters, shelves, storage, and grills.
The top half of the Gabled House can be constructed using either metal studs and concrete board, or half-wide concrete blocks (4x8x16).
The Igloo is constructed using wire mesh, finish concrete, and exterior stucco. The finish material must be finished to repel water.
The lower half of outdoor ovens that use a metal stand can be finished with metal studs and concrete board, and both the metal and concrete block stand can be finished to match to the top of the oven.
Indoor ovens can be placed in corners, against walls, and when the oven is part of a larger remodeling project, can be set back outside a room to make the front of the oven flush with an internal wall. Indoor ovens can easily be set behind a partition wall constructed from metal studs and concrete board.
Finish
Finish materials typically include stucco, brick, stone, marble, travertine, and granite.
Continue on to Foundations to get started.
Return to the Table of Contents.

1. Foundation slab ready to pour
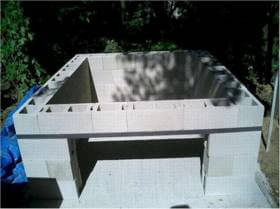
2. Block stand ready for insulating hearth
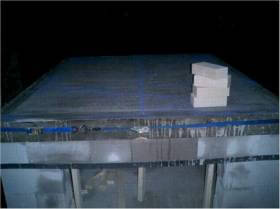
3. Insulating hearth ready for the cooking surface
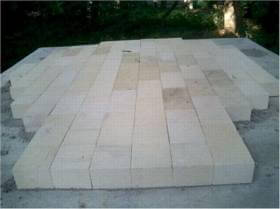
4. Cooking floor
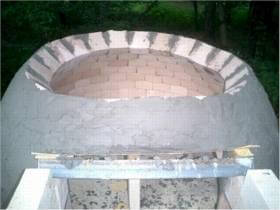
5. Oven dome